

Yes, you can move almost any website to WordPress, no matter what it currently runs on. The right method depends on your site’s size, whether you sell products online, and how much custom functionality you’re carrying over. Most owners choose one of three paths: do it yourself with plugins or manual tools, use host-assisted migration, or hire an agency. Whichever route you pick, the job always breaks down into the same core moves: transfer content, rebuild design and functionality, set up SEO redirects, test everything, then switch DNS.
TL;DR:
- Smaller sites can often migrate in a day using plugins, but large or complex sites may require several weeks or professional help to avoid SEO and functionality issues.
- Key risks include missing 301 redirects, unplanned downtime, and broken integrations, all of which can be mitigated by thorough pre-migration audits and redirect mapping.
- Proper planning involves cataloging all URLs, dynamic elements, and plugin dependencies, plus setting up staging and a clear rollback strategy before starting the move.
- SEO preservation depends on creating a detailed redirect plan and transferring metadata, which should be monitored in Search Console for at least 12 weeks post-launch.
- Agencies follow a structured process: full audits, staging-only builds, testing all features, and providing comprehensive redirect and SEO plans, reducing the risk of ranking loss or site failure.
Table of Contents
- What to Expect When You Migrate Your Website to WordPress
- Pre-Migration Checklist: What to Audit Before You Start
- DIY, Host-Assisted, or Agency: How to Choose Your Migration Path
- Step-by-Step: How to Migrate Your Website to WordPress
- How to Preserve SEO When You Move to WordPress
- How Do You Test a Migrated Site Before Launch?
- What Should You Check Right After Launch?
- How an Agency Approaches a WordPress Migration
- When Should You DIY vs. Hire Help?
- Get Migration Help From All City Graphix
- Sources
- FAQ
What to Expect When You Migrate Your Website to WordPress
Migrating a website to WordPress is rarely an all-or-nothing transfer. Your blog posts, pages, and media files usually move over cleanly. Your design almost never does. Page builders like Wix or Squarespace lock your layout into proprietary code that WordPress can’t read, so you’ll rebuild the visual side using a WordPress theme or a page builder like Elementor. The same goes for custom widgets, booking calendars, or interactive tools built specifically for your old platform. Plan to recreate those from scratch or find a WordPress equivalent.
Timelines vary more than most guides admit. A simple brochure site with a small number of pages can often be fully migrated in a single day. Medium-sized sites with blogs, forms, and a handful of integrations typically take several days to two weeks. Large or ecommerce sites, especially those with dynamic inventory or membership systems, often stretch into multi-week projects. WordPress typically completes professional migrations within a few business days, while self-service imports for small sites can finish quickly.
Three risks account for most migration headaches:
- Lost SEO rankings from missing 301 redirects on changed URLs
- Unplanned downtime during the DNS switch or file transfer
- Broken integrations when forms, payment gateways, or third-party APIs don’t carry over cleanly
None of these are inevitable. They happen when migrations skip the audit step and jump straight to moving files.
Pre-Migration Checklist: What to Audit Before You Start
A migration goes wrong long before anyone touches WordPress. It goes wrong at the planning stage, when nobody bothered to inventory what actually exists on the current site. Run this audit first.
- Export your full sitemap and list every live URL, including pages buried in old campaigns or seasonal content you forgot about.
- Catalog dynamic elements: contact forms, login systems, shopping carts, booking widgets, and any third-party API connections.
- Back up everything offsite: files and database, stored somewhere other than your current host.
- Confirm hosting compatibility: check PHP version support, database access permissions, disk space, and any file upload limits your new host enforces.
- Map your permalink structure and decide whether URLs will change or stay identical.
- Set up a staging environment so nothing touches your live site until it’s tested.
- Write a rollback plan in case something breaks mid-migration.
- Build a redirect mapping file pairing every old URL with its new WordPress destination.
That redirect mapping file deserves its own line item because it’s the single most skipped step. Guides consistently point to missing 301 redirects as the biggest cause of ranking loss during a platform switch, and it’s almost always because nobody built the mapping document before the migration started.
Before you migrate, take stock of:
- Current traffic sources and top-performing pages (so you know what to protect)
- Existing plugin or app integrations tied to your current platform
- Email service connections, since MX records sometimes need updating alongside the site
Pro Tip: Open a spreadsheet before you touch anything technical. One column for the old URL, one for the new WordPress URL, one for redirect status once it’s live. This single document will save you more headaches than any plugin you install.
DIY, Host-Assisted, or Agency: How to Choose Your Migration Path
Your choice comes down to four variables: site size, technical comfort, budget, and how much risk you can tolerate if something breaks.
Plugin-based migration works well for small to medium WordPress-to-WordPress moves or straightforward sites without heavy customization. Tools like All-in-One WP Migration and Duplicator package your files and database into a single transferable file. They’re fast and don’t require command-line skills, but both tools carry file-size and execution-time limits that can trip up larger sites unless you buy the paid extensions.
Manual migration using FTP, direct database exports, or WP-CLI gives you full control and sidesteps plugin limitations entirely. This route suits large sites, custom setups, or situations where a plugin migration has already failed partway through. It demands more technical fluency, since you’re handling database imports and file transfers by hand.
Host-assisted migration shifts the heavy lifting to your hosting provider. Many hosts run server-to-server transfers that bypass upload limits and handle serialized data correctly without you touching a line of code, which makes this a low-effort option when uptime matters. Agencies typically layer in additional QA, SEO redirect mapping, and design rebuild work on top of the technical transfer, which matters most when ecommerce revenue or search rankings are on the line.
AI and automated conversion tools are gaining traction for rapid small-site conversions, especially simple brochure sites without ecommerce. They’re worth a look for speed, but they won’t handle complex integrations or custom database structures reliably.
| Migration path | Best for | Main tradeoff |
|---|---|---|
| Plugin-based (All-in-One WP Migration, Duplicator) | Small to medium sites, simple WordPress-to-WordPress moves | File-size and execution-time limits on larger sites |
| Manual (FTP, WP-CLI, database export) | Large sites, custom setups, plugin failures | Requires technical skill and more hands-on time |
| Host-assisted or agency | Ecommerce, high SEO risk, business-critical uptime | Higher cost, but lower risk of downtime or lost rankings |
| AI/automated conversion | Small, simple sites needing speed | Struggles with complex integrations and custom data |
Step-by-Step: How to Migrate Your Website to WordPress
Once you’ve picked a path, the actual mechanics of moving a site to WordPress follow a consistent sequence, whether you’re doing it by hand or leaning on plugins.
1. Set up your WordPress environment. Choose hosting that supports the PHP version and database access your site needs, then install WordPress. Most hosts offer one-click installs. Immediately create a staging copy so your live audience never sees a half-finished site.
2. Export content from your source platform. Most website builders and CMS platforms offer a native export function, usually producing an XML, HTML, or CSV file. WordPress’s built-in importer under Tools → Import handles standard formats directly. For messier exports, especially from platforms with nonstandard field structures, WP All Import gives you granular control over mapping fields to the correct WordPress post types and custom fields.
3. Transfer your media library. Copy your images, PDFs, and video files into the wp-content/uploads directory, preserving the folder structure where possible. Broken image paths are one of the most common post-migration complaints, mostly because file references inside the database still point to the old location.
4. Move plugins and replicate settings. If you’re coming from another WordPress install, note down which plugins power key functionality like forms or SEO settings, and reinstall WordPress-compatible equivalents if you’re coming from a different platform entirely.
5. Import your database. This is where most manual migrations get technical. You can export your database using phpMyAdmin, a straight mysqldump, or WP-CLI’s export command if you’re comfortable with the command line. Import it into your new WordPress database, then update wp-config.php with the new database name, username, password, and host.
6. Run a serialized-safe search-replace. This step trips up more DIY migrations than anything else. WordPress stores plugin settings, widget data, and some post metadata as serialized PHP strings. If you run a raw SQL “REPLACE” command to swap your old URL for the new one, you’ll corrupt that serialized data and break plugin settings silently. Use WP-CLI’s search-replace command or the Better Search Replace plugin instead. Both understand serialization and update it safely.
7. Rebuild your design. This is the part no export file solves. Choose a WordPress theme or page builder and recreate your layout, matching your brand’s colors, fonts, and navigation structure as closely as the original. Budget real time here. It’s usually the longest single task in the entire migration.
8. Recreate custom functionality. Booking systems, calculators, or interactive tools built specifically for your old platform need WordPress equivalents, either through plugins or custom development.
9. Handle WooCommerce or membership data with extra care. If you’re running an online store, preserving order history, customer records, and payment gateway credentials is non-negotiable. Standard content exports frequently skip custom database tables and transient data that WooCommerce depends on, which breaks checkout functionality if you don’t account for it separately.
Multisite installations add another layer of complexity, since moving a network requires additional database table edits beyond a standard single-site move. If your project touches multisite, budget extra time for that step specifically.
How to Preserve SEO When You Move to WordPress
Search rankings are the single biggest thing owners lose during a migration, and almost always for the same avoidable reason: nobody mapped the redirects before flipping the switch.

Start by building a complete URL mapping document, pairing every old URL with its new WordPress destination. Then implement 301 redirects for every single one, whether through a plugin like Redirection, rules in your host’s control panel, or server-level configuration in your .htaccess or nginx file. A 301 tells search engines the page moved permanently, which transfers most of the ranking value to the new URL instead of starting from zero.
Beyond redirects, carry over your on-page SEO elements directly:
- Title tags and meta descriptions for every page, copied exactly or improved where the old versions were weak
- Heading structure (H1, H2, H3) matching your original content hierarchy
- Canonical tags, especially important if you’re consolidating duplicate pages during the rebuild
- Open Graph data so social shares still render correctly with the right image and description
Once your redirects and metadata are in place, install an SEO plugin like Yoast SEO or Rank Math to manage sitemaps, schema markup, and ongoing optimization. Either plugin will auto-generate an XML sitemap you can submit directly to Google Search Console.
Submit that new sitemap the moment your site goes live, and don’t stop there. Monitor Search Console for crawl errors over the following weeks. Watch your ranking positions for high-value keywords across a 4 to 12 week window post-launch. Rankings typically dip slightly right after a migration, even a clean one, before stabilizing. A steady dip that doesn’t recover by week 6 or 7 usually points to a missed redirect or a metadata gap worth investigating.
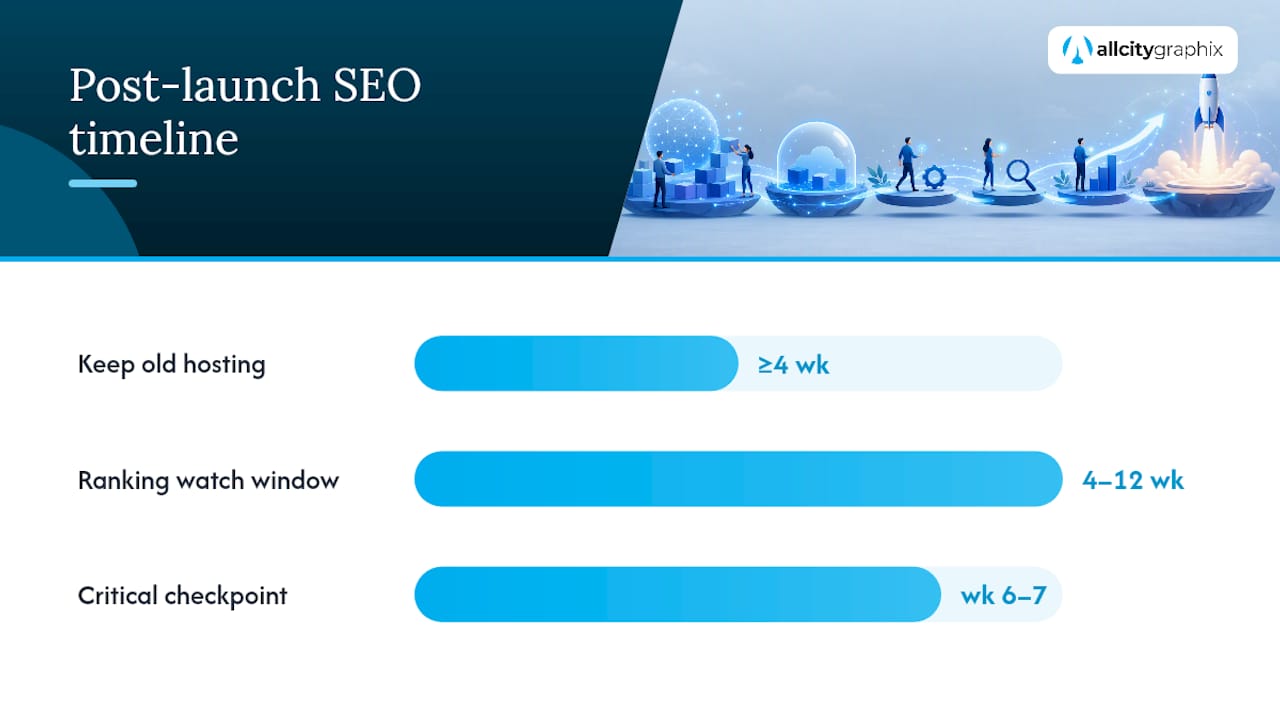
Pro Tip: Keep your old hosting account active for at least a month after launch, even after DNS has switched. If Search Console flags a 404 on a URL you missed, you can still pull the exact content from the old server to fix the redirect properly instead of guessing.
If SEO preservation feels like the part most likely to slip through the cracks, a dedicated local SEO strategy built around your migration timeline helps you catch gaps before Google does.
How Do You Test a Migrated Site Before Launch?
Testing on staging is where you catch the problems that would otherwise surface in front of real visitors.
- Test every form on the site, including contact forms, newsletter signups, and any lead capture tools, confirming submissions actually arrive where they should.
- Walk through the full checkout flow if you run ecommerce, from adding a product to cart through payment confirmation.
- Click every redirect on your mapping list to confirm it lands on the correct new page, not a 404 or a generic homepage redirect.
- Check image and media loading across several page types, since broken paths often hide until you actually browse the site.
- Verify logins for any membership area, client portal, or admin-restricted content.
Once staging passes every check, prepare for the actual cutover:
- Lower your DNS TTL (time to live) at least 24 to 48 hours before the planned switch, so the change propagates faster once you flip it
- Verify your SSL certificate is active and correctly configured immediately after DNS resolves to the new server
- Update MX and SPF records if your email hosting is changing along with your website host, or email delivery can break silently
- Confirm your analytics tracking code (Google Analytics, Meta Pixel, or similar) fires correctly on the new site before you call it done
A hosts-file preview lets you view the new site exactly as it will appear post-launch, using the new server’s IP address while DNS still points elsewhere publicly. This catches last-mile problems that staging URLs sometimes miss. Keeping your old server running for 48 to 72 hours after the switch gives DNS caches time to fully clear worldwide, so visitors hitting outdated DNS records still reach a working site instead of an error page.
What Should You Check Right After Launch?
The first 30 days after migration matter more than most owners expect. Rankings shift, cached pages surface old errors, and small bugs that staging missed show up under real traffic.
Crawl your live site for 404 errors within the first 24 hours, and cross-check every redirect against your mapping document one more time. Pull up Search Console and your analytics dashboard daily for the first week, watching specifically for unexpected traffic drops on previously high-performing pages.
- Take a fresh backup of the newly live site once everything checks out
- Enable caching and, if traffic volume justifies it, a CDN to protect load times under the new setup
- Run a performance test and fix any broken images or dead internal links your crawl surfaced
- Set a recurring 30-day monitoring cadence, checking rankings, crawl errors, and site speed on a schedule rather than only when something looks wrong
Build a follow-up SEO check into your calendar at the 60-day and 90-day marks too. Ranking recovery from a migration often isn’t linear.
How an Agency Approaches a WordPress Migration
Every migration starts with an audit, not a transfer. Before any file moves, the process covers a full sitemap inventory, a catalog of every dynamic element on the current site, and a baseline snapshot of existing search rankings and traffic sources. That baseline matters. Without knowing what “normal” looked like before the move, there’s no reliable way to confirm the migration actually protected the site’s SEO performance afterward.
The build itself happens entirely in staging first. Nothing touches the live domain until forms, checkout flows, redirects, and SSL configuration have all passed QA on the staging copy. Email continuity gets planned alongside the DNS cutover specifically, since MX record changes are one of the more common things smaller migrations overlook.
A migration that skips the audit step isn’t really a migration plan. It’s a hope that nothing important gets missed.
Pro Tip: Ask any agency handling your migration what their rollback plan looks like if something breaks 48 hours after launch. If they don’t have a clear answer, that’s worth noting before you sign anything.
When Should You DIY vs. Hire Help?
Cost, control, and risk pull in different directions here, and the honest answer depends on what you’d lose if the migration went sideways. A five-page portfolio site can absorb a rough weekend of DIY trial and error. A site generating leads or sales every day cannot, because every hour of downtime or every dropped ranking has a real dollar figure attached.
If you’re evaluating a proposal from an agency, ask for specifics: a written redirect mapping deliverable, a staging environment you can review before launch, and a defined testing checklist covering forms and checkout. Vague promises about “handling everything” aren’t a plan.
You can keep costs down without cutting corners by doing the audit and content export yourself, then bringing in help specifically for the technical database work and SEO redirect mapping, where mistakes are hardest to undo.
*— Alex
Get Migration Help From All City Graphix
Moving platforms without a plan is how businesses lose the search rankings they spent years building. All City Graphix runs WordPress migrations the way this guide describes: full audit first, staging-only build, redirect mapping before launch, and a QA pass that actually tests checkout and forms instead of assuming they work.

The team handles the parts that trip up most DIY attempts, including custom theme or page-builder rebuilds, serialized-data-safe database transfers, and post-launch monitoring so a ranking dip gets caught in week one instead of week eight. Typical marketing-site migrations run on a defined timeline agreed upfront, not an open-ended hourly clock. Deliverables include an SEO redirect map, a tested staging environment, and a maintenance plan to keep the new site backed up and fast after launch.
If your current site is overdue for a move and you want it handled without babysitting a plugin all weekend, reach out to All City Graphix for a project quote, or check the full web design and development services page for what’s included at each tier.
Sources
- WordPress
- Migrating from a Website Builder to Self-Hosted WordPress Guide 2026 – HostingGuider
- How to Migrate WordPress to a New Host (2026 Guide) | ZeroToWP
FAQ
Can I Transfer My Existing Website to WordPress?
Yes. Nearly any website, whether it’s built on a drag-and-drop builder, a different CMS, or static HTML, can move to WordPress, though the migration method and rebuild effort depend on how much custom design and functionality you’re carrying over.
How Long Does a WordPress Migration Take?
Smaller sites often finish in a day, medium sites with forms and integrations take several days to a few weeks, and larger or ecommerce sites can require multiple weeks.
Will I Lose My Search Rankings After Migrating?
You risk losing rankings only if you skip 301 redirects, metadata transfer, or sitemap resubmission to Search Console; a properly mapped migration typically sees rankings stabilize within 4 to 12 weeks.
Should I Use a Plugin or Migrate Manually?
Plugins like All-in-One WP Migration or Duplicator work well for small to medium sites, but manual migration or host-assisted transfer handles large sites and complex WooCommerce setups more reliably.
Do I Need to Hire an Agency to Migrate My Site?
Not necessarily. Simple sites are reasonable DIY projects, but ecommerce stores, membership sites, or any site where downtime carries real revenue risk benefit from agency-level QA, staging, and SEO redirect mapping.