
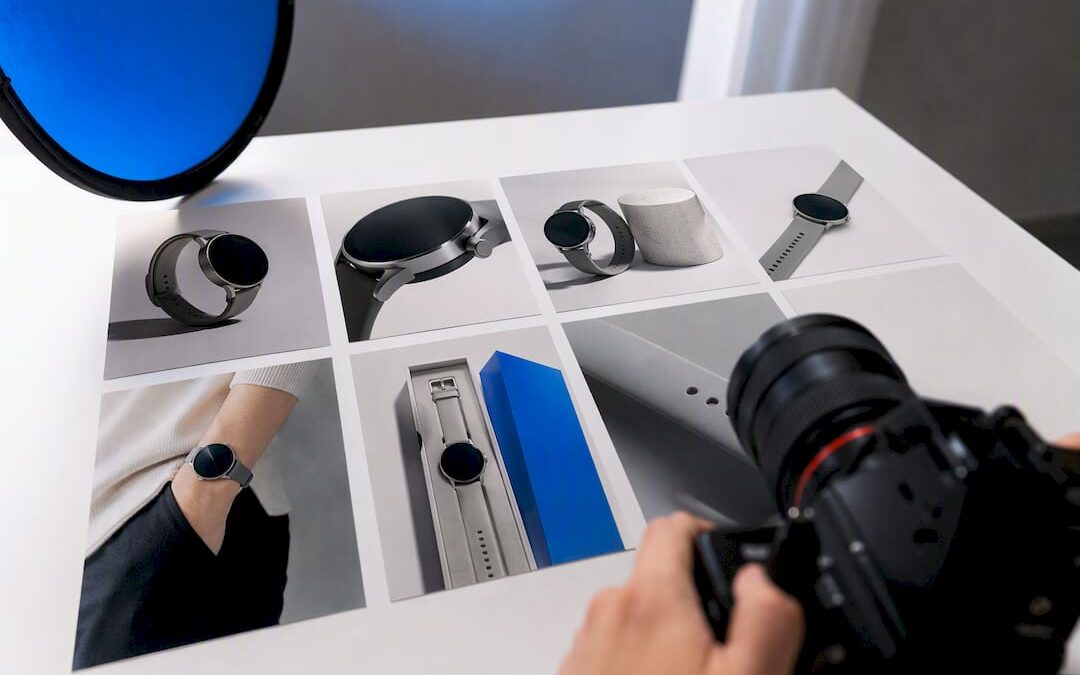
Product photography for ecommerce is a coordinated set of images, not a single hero shot, and it works by showing buyers what they’re actually purchasing from every angle they’d check in a store. The fastest single improvement any seller can make is standardizing a minimum image set (angles, detail, scale) with consistent lighting across every SKU. Do that and buyer uncertainty drops, along with your return rate.
TL;DR:
- Standardizing a set of 6 to 8 images per SKU, including hero, angles, detail, scale, and lifestyle shots, significantly reduces buyer uncertainty and returns.
- Using a DIY kit with a smartphone, tripod, light tent, and reflector can produce reliable results for small products, but larger or complex items benefit from mid-level or studio equipment.
- Consistency in lighting, background, and shot setup, along with detailed workflow control, ensures high-quality, scalable product images that prevent color and quality drift.
- High-resolution master files should be kept uncompressed, while web versions must prioritize fast load times, correct zoom functionality, and file sizes near 100KB for optimal performance.
- Securing proper licensing, clear contracts, and accurate color profiles prevents legal issues and ensures product images look true across all customer devices.
Table of Contents
- What Images Does Every Ecommerce Product Need?
- Equipment and Basic Kit That Gets Reliable Results
- Lighting, Backgrounds, and Shooting Techniques for Consistency
- Building a Production Workflow That Scales
- Post-Processing and File Optimization for Web Performance
- Costing and Hiring Options: Budgeting Per SKU
- Managing Color Profiles and Consistency Across Devices
- Legal Considerations and Image Rights for Ecommerce Photography
- Agency Perspective: Common Mistakes and Quick Wins
- How All City Graphix Handles Ecommerce Photography
- Sources
- FAQ
What Images Does Every Ecommerce Product Need?
A product photo set isn’t complete because it looks nice. It’s complete because it answers every question a shopper would ask if they were holding the item.
Start with the hero, or packshot: a clean, centered, front-facing shot on a white or neutral background. This is the image that shows up in search results and category grids, so it carries the most weight per pixel. From there, build out:
- Multiple angles (front, back, side, three-quarter) so shoppers can mentally rotate the product the way they would in a store
- Detail close-ups on stitching, texture, hardware, or material grain, since 56% of shoppers explore product images the instant they land on a page
- In-scale images showing the product next to a hand, a coin, or a common object, because size confusion is a leading driver of returns
- Lifestyle or context shots that show the product in use, answering “will this work for me?”
- What’s-included shots for anything that ships with accessories, cables, or packaging
- 360-degree spins, where the product category justifies the production cost (furniture, footwear, electronics)
Most sellers land in the 6 to 8 image range per SKU, which gives enough coverage for reuse across product pages, paid ads, and social posts without ballooning production time. Complex products, like anything with moving parts or size variants, often need more.
Pro Tip: Shoot your scale image with the same reference object every time (a specific coin, a 12-inch ruler, a consistent-sized hand model). Buyers subconsciously calibrate faster when the reference doesn’t change from listing to listing.
Equipment and Basic Kit That Gets Reliable Results
You don’t need a studio to shoot images that convert. You need a kit matched to your catalog size and how much time you’re willing to spend per SKU.
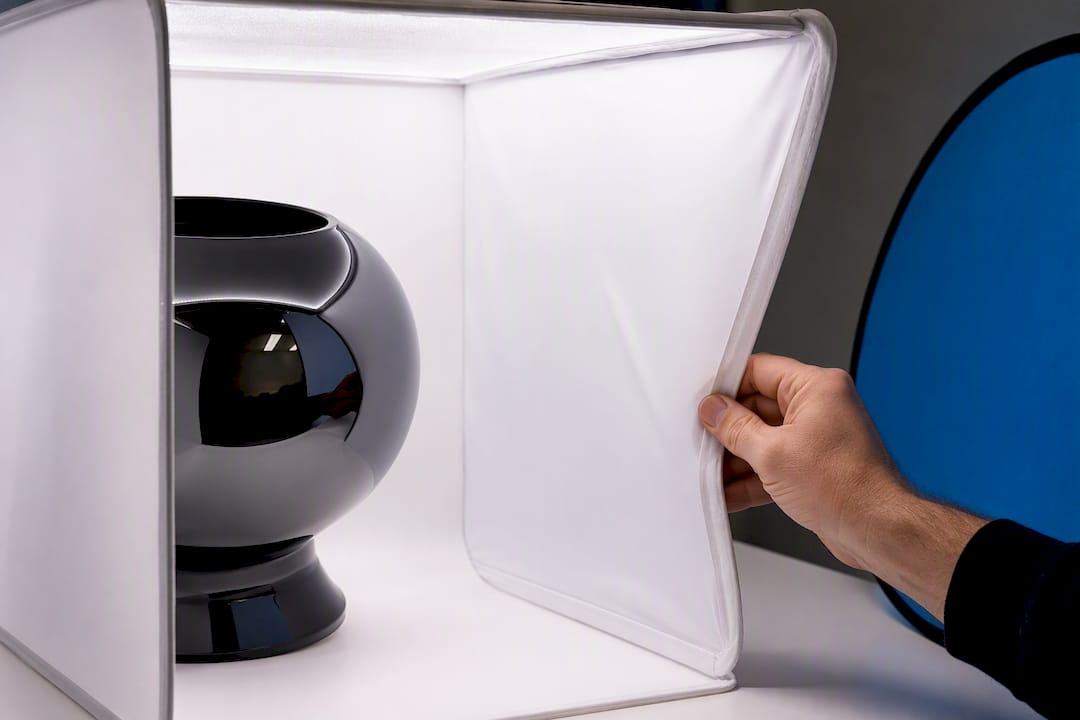
The DIY starter kit covers a surprising number of sellers well: a modern smartphone camera, a tripod or phone clamp, a 24 to 32 inch collapsible light tent, and a white foam board reflector. This setup handles flat lay and small product shots cleanly, especially for jewelry, cosmetics, and accessories under a few inches.
The mid-level kit is where quality jumps noticeably. A mirrorless or DSLR body, a 50mm or dedicated macro lens for close detail work, two softbox lights on stands, and a sturdy tripod. This tier handles apparel, footwear, and mid-size home goods, and it’s the point where controlled lighting equipment like tents, cycloramas, and light tables starts paying for itself in reduced retouching time.
At the pro or studio tier, sellers add tethered capture (camera connected live to a laptop), a light table for glassware or bottles that need bottom-lit backgrounds, and a color-calibrated monitor so what you see while editing matches what customers see on their screens.
A short accessory list saves more headaches than any camera upgrade:
- A gray or color reference card, shot in the first frame of every session
- Lint-free cloths and a rocket blower for lens and product dust
- Clamps and gaffer tape to hold props and backdrops in place
- Painter’s tape marks on your table to lock the exact camera and product position between shoots
Lighting, Backgrounds, and Shooting Techniques for Consistency
Clean white-background packshots need at least two light sources: one key light on the product and one on the background itself. Without a dedicated background light, you’ll fight gray, uneven whites that need extra editing to fix later.
Here’s the practical setup sequence that keeps results consistent across a full session:
- Position your white sweep (a curved backdrop with no visible seam) and light the background separately from the product to avoid blown-out edges or dark corners.
- Add diffusion, a softbox or shoot-through umbrella, so the key light doesn’t create harsh specular hotspots on glossy or metallic products.
- Use a white foam board or bounce card opposite your key light to fill shadows without adding a second full light.
- Shoot at a narrow aperture (f/8 to f/11) for enough depth of field to keep the whole product sharp, with ISO as low as your lighting allows.
- If you’re shooting more than a handful of products, tether the camera to a laptop. You catch focus and exposure problems immediately instead of finding them during editing, hours later.
Reflective surfaces (glass, chrome, glossy plastic) are the hardest category to get right. Tenting the product in diffusion material, or shooting through a cut hole in white foam board, eliminates most unwanted reflections without heavy retouching. Always confirm color accuracy in-camera before mass shooting. That first reference-card frame lets you correct white balance once and apply it across the entire batch.
Pro Tip: If your product line includes anything glossy, black, or chrome, tent it even for a “quick” shoot. Reflections you don’t notice on the camera’s small screen show up glaringly once the image is on a 27-inch monitor.
Building a Production Workflow That Scales
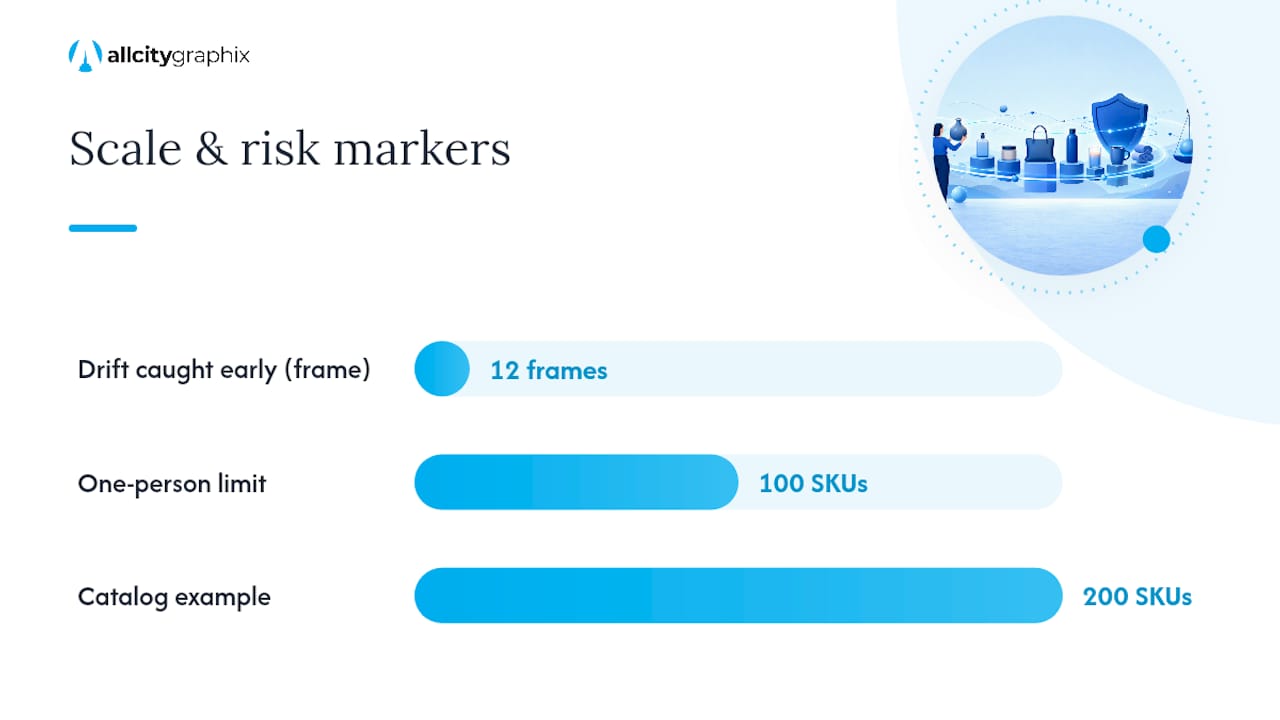
A one-off shoot is easy. A catalog of 200 SKUs shot consistently over six months is where most sellers lose control of quality.
The fix is a repeatable Plan, Shoot, Deliver pipeline. In the planning stage, build a shot list per product family (not per individual SKU) so variants share the same angle, crop, and lighting setup. Shoot the first item in a family with your reference color card and treat that frame as the master. Every other variant in that family gets edited against the same settings, which batching by family and syncing edits from a single reference frame prevents color drift across dozens of SKUs shot on different days.
Lock these standards before you shoot a single frame:
- Final image dimensions and aspect ratio for your platform
- A single color profile (sRGB is standard for web) used across every export
- Consistent shadow style (hard, soft, or none) across the whole catalog
- Crop tightness and product placement within the frame
- A file naming convention that ties images to SKU numbers automatically
Quality control gates matter more than most sellers expect. Check focus, color, and crop against your reference frame before moving to the next family, not after the whole session wraps. Catching a lighting drift on frame 12 costs you five minutes. Catching it on frame 200 costs you a reshoot.
A majority of shoppers tend to interact with product images immediately upon arriving on the product page., which means a broken workflow doesn’t just look sloppy internally. It shows up immediately in bounce rates.
When your catalog outgrows a one-person operation, that’s the signal to bring in a studio or agency rather than adding more freelance hands with inconsistent styles. All City Graphix built its photography process around exactly this kind of family-batched, color-proofed pipeline for small businesses scaling past their first hundred SKUs.
Post-Processing and File Optimization for Web Performance
Editing priorities should follow a strict order: color correction against your reference card first, background cleanup second, honest retouching (removing dust, not reshaping the product) third, and sharpening last, applied only after resizing.
Keep two versions of every final image. Your master archive stays large and uncompressed, ideally 3000 to 4000 pixels on the long edge, so you always have a high-resolution source to re-export from later. Your web exports are a different animal entirely: most platforms recommend keeping standard product images near 100KB where feasible, using WebP instead of JPEG for meaningfully smaller file sizes at comparable quality.
For zoom functionality specifically, don’t cut corners. A quarter of ecommerce sites fail to provide sufficiently high-resolution images or working zoom, which is one of the more fixable conversion leaks in ecommerce. Your gallery should swap in a higher-resolution file the moment a shopper zooms, rather than stretching the same small image and producing a blurry mess. Test this behavior on an actual phone, not just your desktop browser, since zoom interactions render differently across devices.
Getting the compression-versus-quality balance right ties directly into overall page speed, which affects both conversion and search ranking. All City Graphix’s guide to website speed optimization covers the compression tradeoffs in more depth if your product pages are currently loading slowly because of oversized images.
Key export targets worth locking into your standard operating procedure:
- Web display size: 2048 to 2400 pixels on the long edge for platforms with zoom
- File format: WebP where your platform supports it, JPEG as fallback
- Target file size: as close to 100KB as quality allows for standard listing images
- Master archive: full resolution, stored separately, never overwritten
Costing and Hiring Options: Budgeting Per SKU
Pricing in this industry can include various models such as per-image rates, per-SKU-set packages comprising multiple images, day rates for shoots, or retainers for ongoing production.
What moves a quote up or down is rarely the shoot itself. It’s the variables around it:
- Number of variants per product (colors, sizes) that each need their own frame
- Styling complexity, whether a product needs steaming, assembly, or prop staging
- Retouch depth, from basic color correction to heavy background compositing
- Turnaround time, with rush delivery commanding a premium almost everywhere
DIY works well for sellers under 50 SKUs with simple, non-reflective products and time to spare. A freelancer makes sense once styling or lighting complexity exceeds what a smartphone kit handles well. A studio or agency earns its cost when catalog size, consistency requirements, or channel-specific export needs (marketplace, paid social, PDP) make in-house production a bottleneck.
Whoever you hire, request a firm deliverables list before the shoot: full-resolution master files, pre-sized web exports, and a color proof showing the final look before you approve the batch.
Managing Color Profiles and Consistency Across Devices
Color that looks accurate on your monitor and washed out on a customer’s phone is one of the most common (and least discussed) problems in ecommerce imaging.
The fix starts with your color space. Shoot and edit in sRGB, the standard color profile for web display, not Adobe RGB, which covers a wider gamut but renders inconsistently in most browsers and can shift colors unexpectedly once uploaded. If your camera offers a choice, set it to sRGB in-camera so you’re not converting later and risking a shift.
Calibrate your editing monitor periodically using a hardware calibration tool if you’re shooting more than a handful of products a month. An uncalibrated screen can make you “correct” colors that were already accurate, introducing errors you won’t catch until a customer complains that the sweater they received doesn’t match the photo.
Consistency across devices comes down to testing, not guessing. Pull up your product pages on an older Android phone, a recent iPhone, and a couple of different desktop browsers before finalizing a batch. Screens vary in brightness and color rendering more than most sellers assume, and a color that reads true on a calibrated studio monitor can shift warm or cool on consumer hardware.
The reference card habit from your shoot pays off again here: if a color complaint comes in, you can pull the original reference frame and confirm whether the issue is in your file or in how a specific device renders it.
Legal Considerations and Image Rights for Ecommerce Photography
Ownership of your product images depends entirely on what your contract says, not on who pressed the shutter.
If you hire a freelance photographer or studio without a written agreement, default copyright law in most cases leaves the photographer owning the images, even though you paid for the shoot. Always secure a licensing agreement or full copyright transfer in writing before the shoot happens, not after you’ve already used the images on your site.
Watch for a few recurring gaps in vendor contracts:
- Usage scope: does the license cover your website only, or also paid ads, marketplaces, and print catalogs?
- Exclusivity: can the same photographer sell similar shots or styles to a competitor?
- Model releases: any lifestyle shot with a person requires a signed release, even for a friend or employee who agreed verbally.
- Prop and location rights: borrowed props, rented locations, or branded backgrounds can carry their own usage restrictions.
If you’re using a manufacturer’s stock images instead of shooting your own, confirm in writing that you’re licensed to use them on your specific sales channels. Some manufacturers restrict stock imagery to their own site and revoke retailer use without notice.
Request full copyright transfer language in any contract you sign, and keep the signed agreement on file for as long as the images stay live on your site.
Agency Perspective: Common Mistakes and Quick Wins
The mistakes we see most often aren’t about gear. They’re about inconsistency: crop and scale that shift from product to product, no fixed color workflow, and missing scale shots that leave buyers guessing on size.
Three fixes cost almost nothing. Grab a $15 foam board reflector before you buy another light. Lock a crop template in your editing software so every image gets cropped identically. Shoot your first frame of every session with a color reference card, tethered if you can manage it, so you have one clean baseline to correct against.
Escalate to a professional once your SKU count or reshoot rate makes DIY the more expensive option.
— Alex
How All City Graphix Handles Ecommerce Photography
Product photography runs the same way branding work does: discovery first, execution second, nothing left to guesswork about what the final files need to do. For sellers who’d rather hand off the whole image pipeline than manage lighting rigs and color proofs themselves, that’s the practical alternative to piecing together gear and freelancers on your own.

The process starts with a discovery conversation about your catalog, channels, and brand style, followed by a locked shot list before a single frame gets shot. From there, every session runs on color-proofed reference frames, delivering both full-resolution master files and pre-sized web exports built for specific platforms, whether that’s a storefront, a marketplace listing, or paid social creative. Quality control happens before delivery, not after a mismatched batch is noticed live on a site.
If your current image set is holding back conversions or costing you more in returns than it should, get in touch with All City Graphix to talk through your catalog, or browse the full range of services to see how photography fits alongside branding and web design.
Sources
- A guide to effective product photography for ecommerce
- Ensure Sufficient Image Resolution and Zoom – Baymard
- How to rock product photography on a budget | BigCommerce
- Raise your product photography game with the right gear | B&H Explora
- E-Commerce Product Photography Workflow Guide (2026) – Tov Studio Photo
FAQ
How Much Does It Cost to Have an Ecommerce Product Photographed?
Costs vary widely by model: per-image rates, per-SKU-set packages, or day rates, with variant count, styling complexity, and retouch depth driving the price up or down. DIY setups cost only the equipment, while studio or agency work reflects the full production and QC pipeline behind each set.
How Do You Take Product Photos for Ecommerce?
Standardize a minimum image set per SKU (hero, angles, detail, scale, lifestyle), shoot on a white sweep with a key light and separate background light, and lock your crop, color profile, and file naming before you scale up production.
What Is the 20-60-20 Rule in Photography?
There’s no single agreed-upon definition of a “20-60-20 rule” specific to product photography; the term shows up more commonly in general exposure or composition contexts, so treat any strict version of it with caution rather than as an ecommerce standard.
What Is Ecommerce Product Photography?
It’s the practice of creating images that showcase products for sale and help customers understand what they’re buying, covering everything from clean packshots to lifestyle context shots that build buyer confidence before checkout.